Calling all Electronics Wizards and Open Source Hardware enthusiasts to help me fix my Motor Controller…

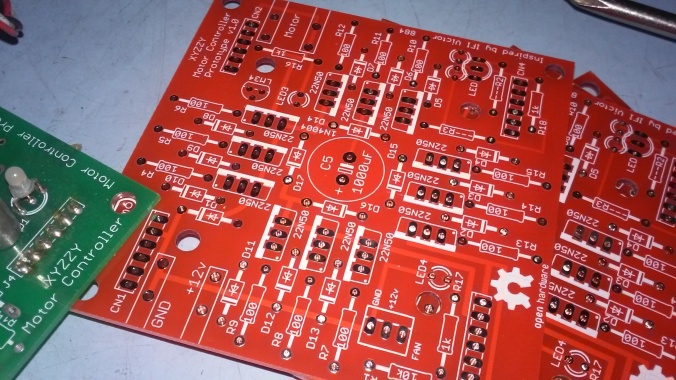
Okay. So, i’m a little embarrassed that this thing is still not working. I’ve made cool progress on it over the years, but not the part that matters… that it actually works. This should not be that hard. Since it’s basically an HIP4081A beefy full h-bridge controller and an Arduino it should not be all that complicated. I think what i need to do is just spend some money on known good components and true schottky diodes and mosfets and just breadboard this thing out. Once i can get this reliably working on a breadboard i can come back to the PCB design stuff. I know last time i messed with it i had a few PCB wiring issues and when i was testing the h-bridge i could only get one side to turn on. The other side was shorting out somehow.

20171123_111038

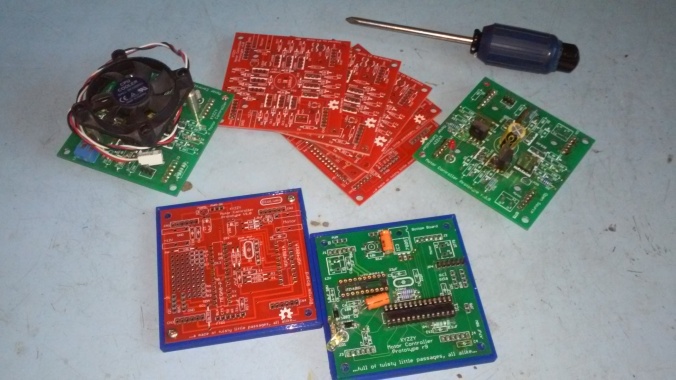
Having said that, i’m still pretty happy with the overall PCB design and direction that is heading. I really enjoy the two PCBs that plug into each other via male and female headers ans sockets. I just put up my files (in their old unkempt state) onto GitHub for version tracking and in true Open Source Hardware fashion for others to hopefully help collaborate with me on this. I really really really want to see this thing work someday and turn into a cool motor controller that people use all over to build cool robots and stuff with in the near future.

20171123_111058

So, please… If you are good with electronics and electronic theory, especially motor control, if you are an open source enthusiast, if your good with git, if you are good with EagleCAD, if you have an interest in a cool Open Source motor controller based on MOSFETS, if you were a user of the old FIRST Robotics, VEX Robotics, or IFI Victor 884s or 885s that this design is based on (now a defunct product to my knowledge), if you’d like a motor controller you can hack, use I2C or add a CAN bus or some other device such as a current sensing circuit, or who knows what else, then PLEASE PLEASE Help Me! Help me get this thing working and ready for market and usability and hackability. I’m not ashamed to ask for help or to admit that i need it. I’m proud of how far i got with as little electronics knowledge as i do have, but concede that there are so many other people out there that can help!


I have uploaded the last freeze of this project onto a new github project for you all to easily get the source files here: https://github.com/keen101/XYZZY-Motor-Controller

I’ve also designed a neat little 3d printable base to keep this thing from shorting out. And i will track down the other design files that are relevant or that this design is based on in the next couple days / weeks.

20171123_111133


*Bonus Offer: I have several old PCBs of V. 1.0 laying around. For anyone willing to help me with this project i would be willing to send you up to 3 copies of the top and the bottom boards each to play with (while supplies last). There are i think at least two potential PCB trace errors (that i can’t remember what at the moment) that are on the boards, but hey, free boards and it’s not that hard to cut a trace or two and rewire if needed. You would just need to obtain the needed mosfets, diodes, arduino, and HIP4081A h-bridge driver chip to work on the project. Heck, i’m even willing to entertain replaccing the HIP4081A chip to a different one if there are any better or cheaper options that do basically the same thing. Please Help 🙂

Bitten by the Electronics Bug

So recently I’ve been bitten by the project bug again. And quite a bit by electronics hobby-type stuff again in particular, though not exclusively. More blog posts and updates to come soon.

dscf8030

On the left is my old homemade DIY arduino based avr high voltage programmer made on old Hewlett Packard Engineering Protoboard based off of Jeff’s original design that i made in 2011. On the right is my brand new updated model named the AVR HV Rescue Shield 2 from MightyOhm.com. It’s main function is to help reset the fuses on AVR chips when you program them wrong. My old one came in handy and has saved a few chips from time to time. The new one obviously is better, mostly because now that i’m tinkering more with attiny85V chips i now have a High Voltage Rescue shield for them too, though it also does not require an external 12VDC power source as it has some sort of built in surface mount step up voltage chip.

dscf8031

So as briefly mentioned above i’ve been tinkering with trying to program attiny85v AVR chips. I’ve dug out my old trusty USBtinyISP AVR Programmer and I’ve recently gotten a Sparkfun Tiny AVR Programmer.

What i’m really intending to do is make a shrunk down version of my old Mystery Project by re-purposing and reprogramming my Adafruit TV-b-gone kit. I just need to get the frequency right. I’m starting by seeing if i can compile and upload the tvbgone AVR/arduino code to a blank attiny85 first. If i can do that i can work on changing the code. So far though i haven’t gotten the AVR fuses correct yet to use the tvbgone’s external 8mhz oscillator, though i think the program has uploaded correctly. That’s why i needed the HV Rescue Shield 2 mentioned above.

In addition, i finally ordered the parts to finish my DIY Arduino MENTA boards. They are cool Adafruit designed Arduino compatible boards that fit into an Altoids mint tin.

dscf8032

Some of the other items I’ve been tinkering with have been Raspberry Pi’s, including various Linux-based Operating Systems including Raspian (a debian based distro), Octopi (debian running Octoprint – 3D printer software), and RetroPie (an emulator to play old roms for NES, SNES, Playstation, Atari, Gameboy, and other popular gaming systems). The tiny $5 Raspberry Pi Zero. Tinkering with automatic plant lights and a gardening moisture sensor. And my fancy new SparkFun Vernier Interface Shield an upgrade to interface my Vernier sensors with Arduino. More on that in another post soon!

dscf8033

I also recently ordered a USB cable in order to salvage a scrounged barcode scanner that my brother saved from the Barnes And Noble dumpster. The USB cable works! Now i just need to figure out a use for it. Not bad for a $10 cable on ebay to a functional $200 value barcode scanner.

Updating and perfecting the XYZZY Motor Controller

XYZZY_Top_Board_V1.0

I’m working on finishing and perfecting an old project of mine (by a few years). The XYZZY Motor Controller (H-bridge). The old design was only somewhat functional. Enough to prove proof of concept (barely), but i want a sleek, finished version that people can actually use. So i’m working on perfecting this prototype design. I’ve just updated several things on the top board, and i think it’s done. The biggest issue was a pretty major design flaw which was that i forgot to add the safety diodes for motor kickback. In simple terms that meant that when the motor stopped turning or i switched it from forward to backward the electrical energy would destroy the Mosfets! …oh.. noo… Yup.

Not to worry, they are there now. I will be wiring them in manually to some of my old prototype boards to test soon. This design is progressed enough to update it to V1.0 instead of Rx.x number. Although the top board is finished, the bottom board needs quite a bit of work and possibly major redesigning. from the looks of my old design for the bottom board it looks like one feature i wanted to implement was an I2C bus. That would make it cool to connect them together and then to a microprocessor to monitor them in real-time. The only sensors to monitor at this point was the inclusion of a crude temp sensor and monitoring the RPM of the fan. Although i was hoping to build an arduino chip built in. When i eventually purchase new PCB’s i think this revision is finally deserving for the color red! Although purple or black would look pretty sick too. Any comments are welcome.

This is an Open Source Hardware Design.

DSCF7247 DSCF7248

DSCF7249

Mystery Project

I recently completed an electronics project. Actually it was an old project, but i upgraded the board and made it look as nice as possible. I am referring to this as my “Mystery Project” since i will not be saying what this is or what it is for. You can let your imagination run wild and see if you can figure it out! 😉

DSCF7243

HP/Agilent 03458-66509 7V DC Reference Clone

This past week I’ve been helping my dad design some replacement boards for the HP/Agilent 3458A multimeter.  I don’t know much about what these actually do, but he says that this board is the heart of the 3458A. Apparently it is some sort of DC reference board which uses the LTZ1000.  Anyway the protoypes seem to have tuned out great. He thinks he might try to sell his boards on ebay. The cool thing is that we tried hard to keep everything pin compatible so they should work fine in an actual 3458A or standalone in a project like this one.

DSCF1513

DSCF1512

Interfacing Vernier Sensors and Arduino (and vice-versa!)

So, recently I’ve been bored. That’s nothing new really. The up side to the times when i get really bored is that i usually end up starting some sort of electronics project. Since i have an interest in the DIYBIO movement and an interest in DIY chemistry i have realized that it’s really cool (and helpful) when you can use sensors to collect your data. But up until now i haven’t had the motivation (or the money) to really dive into it. But today’s post may be the beginning to turning that tide.

Awhile back i stumbled across this post by David Hay, after noticing this question on adafruit. In it he tinkers a bit with interfacing an older vernier (light?) sensor with an arduino clone.  Since i use vernier sensors in my chemistry classes at school i have come to love them. I wondered if i could do something similar, but what i really wondered was whether i could do the opposite as well. Could i interface other non-vernier sensors (like sparkfun sensors) using an arduino to the fancy LoggerPro software or my TI84+ calculator? It turns i can!

DSCF15033

The LoggerPro software is really good stuff, but i’m cheap whenever i can be. That’s one reason i thought of my TI84+ calculator. I already have one of those, and vernier has released free software for it that can graph data from vernier sensors in real time. The program is called EasyData and can be downloaded here. The second option is to use LoggerPro on Linux. And since i’m already a full time Ubuntu user i get to use the newly updated free LoggerPro beta for Linux! Sweet Beans!

DSCF15011

I’ve already tested both. They both work great. The cool thing is that i was able to hook an arduino to my calculator EasyData program and also LoggerPro on the computer by using a Vernier EasyLink (with an adapter to convert it into a GoLink). I had to get a Vernier Analog Breadboard Cable for it to work, but it was well worth it. I sent some test pwm values using the Arduino example code for the fading led on arduino digital port 9. I used the example pdf from the DIY Light Intensity Sensor example project on the Vernier website to help me out a bit.

DSCF15022

I was also able to do the opposite like what David Hay did with his sensor. I was able to successfully interface a stainless steel temperature probe from Vernier (which is basically just a thermister in a nice case) to my Arduino. I used the example pdf from the DIY Build a Temperature Sensor example project to help me out, along with the values in an equation provided in the manual that came with my stainless steel temp sensor. I also bought this nice Analog Proto Board Connector from vernier which allowed me to do this so quickly. Here is the code i used on my Arduino to calculate the temperature from this thermister.

*/
int led = 13;

#include <math.h>

#define ThermistorPIN 0 // Analog Pin 0

float vcc = 4.91; // only used for display purposes, if used
// set to the measured Vcc.
float pad = 15000; // balance/pad resistor value, set this to
// the measured resistance of your pad resistor
float thermr = 20000; // thermistor nominal resistance

float Thermistor(int RawADC) {
long Resistance;
float Temp; // Dual-Purpose variable to save space.

Resistance=((1000 * pad / RawADC) – pad);
Temp = log(Resistance); // Saving the Log(resistance) so not to calculate it 4 times later
Temp = 1 / (0.001129148 + (0.000234125 * Temp) + (0.0000000876741 * Temp * Temp * Temp));
Temp = Temp – 273.15; // Convert Kelvin to Celsius
Temp = Temp / 2;

// BEGIN- Remove these lines for the function not to display anything
//Serial.print(“ADC: “);
//Serial.print(RawADC);
//Serial.print(“/1024”); // Print out RAW ADC Number
//Serial.print(“, vcc: “);
//Serial.print(vcc,2);
//Serial.print(“, pad: “);
//Serial.print(pad/1000,3);
//Serial.print(” Kohms, Volts: “);
//Serial.print(((RawADC*vcc)/1024.0),3);
//Serial.print(“, Resistance: “);
//Serial.print(Resistance);
//Serial.print(” ohms, “);
// END- Remove these lines for the function not to display anything

// Uncomment this line for the function to return Fahrenheit instead.
//temp = (Temp * 9.0)/ 5.0 + 32.0; // Convert to Fahrenheit
return Temp; // Return the Temperature
}

void setup() {
Serial.begin(9600);
pinMode(led, OUTPUT);
}

void loop() {
float temp;
temp=Thermistor(analogRead(ThermistorPIN)); // read ADC and convert it to Celsius
Serial.print(“Celsius: “);
Serial.print(temp,1); // display Celsius
//temp = (temp * 9.0)/ 5.0 + 32.0; // converts to Fahrenheit
//Serial.print(“, Fahrenheit: “);
//Serial.print(temp,1); // display Fahrenheit
Serial.println(“”);
digitalWrite(led, LOW);
delay(1000); // Delay a bit…
digitalWrite(led, HIGH);
}

So what does this mean? I think this opens up a whole new world of possibilities. On the one hand i believe i can now use the nice Vernier LoggerPro or EasyData real-time graphing software to interface non-vernier sensors like Arduino boards directly and perhaps others like a Sparkfun Alcohol sensor? (which i have one i would like to try) This should make it easy to interface cheap sensors in chemistry and biology labs that already have vernier equipment. I think it also means that we can now easily use Vernier sensors on non-proprietary devices such as cheap Arduino micro-controllers.

I also look forward to soon tinkering with using an Arduino webserver as a different real-time sensor graphing and data logging device. I hope in the future i can help to create other tools which might be useful for DIYBIO and other DIY science.

FIRST Robotics Open Source Electronics

After spotting an article on MAKE about NASA providing a huge $20 Million grant, i realized that many people might not know that FIRST Robotics now releases their electronic designs in true Open Souce spirit.

I’m no longer involved in FIRST, but during my last year i wrote FIRST a letter explaining how i thought they needed to adopt an open source credo. My letter didn’t cause a revolutionary change, but i did receive a response that was a bit unexpected. It turns out that more than a few were impressed with my letter, and decided to release all their electronics designs in the public domain. Including CAD files, PCB designs, and Schematic diagrams. Like i said, not a huge change, but a step in the right direction.

http://www.usfirst.org/roboticsprograms/frc/control-system-resources

I’m not sure if their software is still mostly proprietary or not. But, i do think there are multiple programming languages available, and perhaps they are cross-platform. That seems like a step in the right direction too. 🙂

Roboduino

Somewhere i probably said i hate electronics. I’m sure i meant it at the time. Unfortunately it’s not as simple as that. I suppose i have a love/hate relationship with electronics. Somedays it’s fascinating, and other days quite the opposite. Anyway….. The arduino bug has bitten me again….

This time I’m diving deeper into Roboduino Land!! (I just bought me a $30 Chinese roboduino knockoff off ebay)

Roboduino

We will see if the quality is decent. I usually don’t buy known Chinese knockoffs, but i was never going to pay $50 for a roboduino!!!! In fact… I plan on making a simple robo-shield for converting regular arduino’s, as well as a robo-shield for an Arduino-Mega!!!

I think a roboduino-mega would be an awesome robot controller.

Will i loose interest in this project like my mosfet speed controller? …I dont think so, since it should be pretty easy compared to that, but only time will tell…  Wish me Luck!!

on a related note, i found these two cool projects/products:

http://letsmakerobots.com/node/9808

http://www.societyofrobots.com/step_by_step_robot_step3B.shtml

EDIT: Okay, It finally arrived from Hong Kong. It seems to work just fine. Apparently the roboduino is designed, so that you have to use an external power supply to power the servos. Other than that, all i can say is that the Chinese soldering isn’t exactly professional, but within acceptable limits, and it obviously has not been cleaned with a rosin cleaner.